 📂 Photo Organization Guide
What to Do After the Event: 7 Smart Ways to Organize Event Photos from Your Google Drive

Quick Answers: Organizing Google Drive Event Photos
How do you organize event photos in Google Drive?
EventSnap creates a dedicated event folder automatically. Within it, photos are organized by upload time. After the event, use Google Drive's built-in tools to create subfolders, star favorites, and share specific photos with family.
Can you automatically sort Google Drive photos by event?
Yes. When you create an event in EventSnap, all guest uploads go into one clearly named folder. Each event gets its own folder, keeping your Drive organized automatically.
Imagine opening your Google Drive the morning after your big event. There they are. Hundreds of files, all in glorious, full 4K and 1080p resolution, straight from your guests' phones. You successfully bypassed login walls, disappearing links, and compressed quality that makes everyone look like a pixelated video game character.
Because EventSnap routes everything directly to your personal Google Drive account and completely skips centralized cloud servers, the photos are yours forever. We have discussed this extensively in our guide called Your Memories, Your Google Drive: How EventSnap Works. Permanent ownership of digital assets is crucial for wedding photo sharing apps in 2026.
However, having 347, 500, or even 1000 photos and videos automatically deposited into a single massive folder can feel a little overwhelming at first glance. How do you find the hidden gems, fix the tricky lighting, and share the best moments with your family and friends without spending weeks staring at your laptop screen?
In this comprehensive guide, we are going to walk you through 7 incredibly smart, time-saving ways to tame the chaos. We will turn those raw uploads into a beautiful keepsake album in under 30 minutes total. Let us dive in to the most efficient organization techniques for Google Drive event photos.
Way 1: Build a One-Click Folder Structure

Your EventSnap folder is currently a chronological river of memories. The first and easiest step is creating digital "buckets" for different types of content.
Right-click inside your primary EventSnap event folder, select New Folder, and create broad subfolders. For a wedding, this could be 'Rehearsal Dinner', 'Ceremony', 'Reception', and 'Videos'. For a corporate retreat, it might be 'Keynote', 'Team Building', and 'Happy Hour'. Establishing categories is exactly what premium photo sharing apps force you to do manually, but Google Drive allows you the flexibility to build your own.
Pro Tip: Unlike hosted web galleries from competitors that aggressively delete your memories after 30 days, these folders live in your Google Drive forever. They persist even if you cancel your internet provider or never use EventSnap software again. Permanent digital sovereignty is the ultimate shared album alternative.
Instead of manually sorting every single photo, use the power of batch shifting. Just drag and drop large chunks of the timeline into their respective folders. Because your guests uploaded chronologically, you can highlight fifty photos taken between 6:00 PM and 8:00 PM and drop them all simultaneously right into 'Reception'.
Way 2: Let Google Photos Auto-Create Albums with AI Magic
What if you do not want to organize files by hand? Let Google's cutting edge Artificial Intelligence do the incredibly heavy lifting. Because your photos are already sitting beautifully in your Google ecosystem, moving them into Google Photos for smart organization is shockingly simple.
Head over to Google Photos on any desktop browser, click 'Upload', and select 'Google Drive'. Navigate to your EventSnap folder and import the batch of photos. Google Photos will immediately scan the files. It will automatically recognize faces, indoor versus outdoor lighting situations, locations, and even specific types of objects like wedding cakes, champagne glasses, or dance floors.
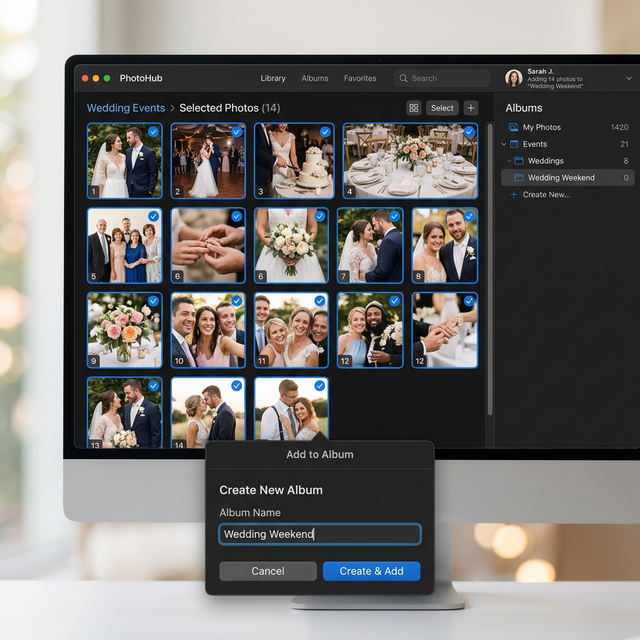
You can instantly create a 'Wedding Weekend' album, and Google will even suggest the very best photos based on focus depth, exposure balance, and smiles. It feels exactly like having a free digital photo assistant instantly curate the top highlights, saving you hours of manual clicking.
Comparing Event Photo Storage Architectures
Before moving to advanced search techniques, it is critical to understand why we insist on using Google Drive architecture instead of specialized cloud applications.
| Architecture Type | Lifespan | Hidden Costs | Feature Set Control |
|---|---|---|---|
| Traditional Photo Apps (GuestPix, Kululu) | 3 to 12 Months | High. Extortionate fees to download raw archives. | Locked. You must use their proprietary tools to sort images. |
| EventSnap + Google Drive API Ecosystem | Permanent / Lifetime | Zero. You own your 15GB of free space. | Total. Full access to Google Workspace plugins and Search. |
Way 3: Use Drive Search Superpowers
Did you know Google Drive has powerful hidden search operators designed to filter your uploads instantly? You do not need to scroll through a thousand files manually to find exactly what you are hoping to isolate.
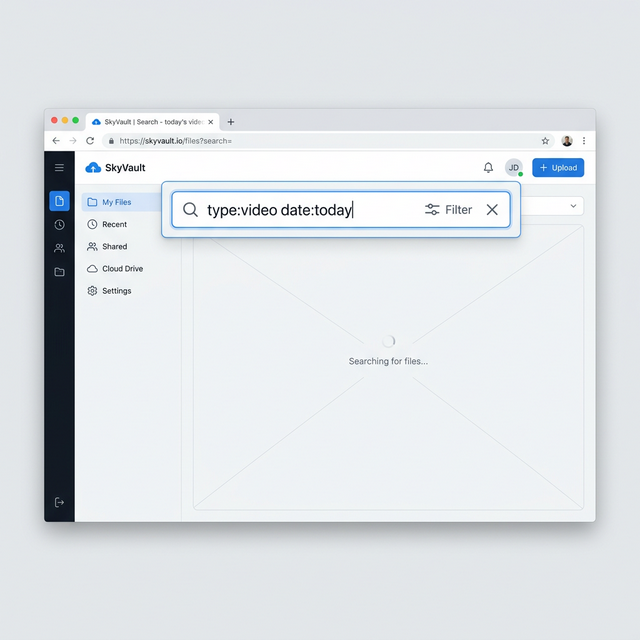
- Video Isolation: If you are hunting specifically for the wild dance floor videos your friends took, go to the upper Drive search bar and type
type:video. Drive will immediately hide all static images and surface only the clips. - Image Only Filtering: Conversely, type
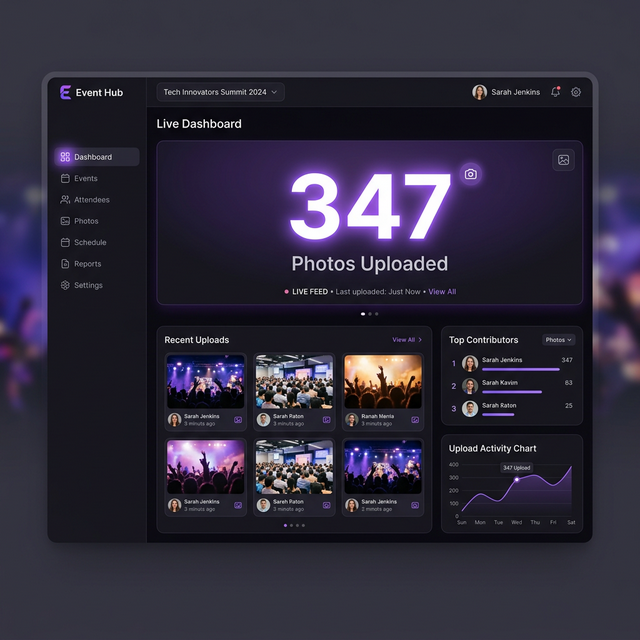
type:imageto eliminate bulky video files when you just want to find a picture suitable for Instagram. - Timestamp Specific Targeting: Use the real time upload log in your EventSnap dashboard to know exactly when the best videos arrived. If you see a major spike in video uploads occurring right at 11:30 PM, you can search Drive using
after:2026-06-12to zero in specifically on the late night fun.
Way 4: Star and Label Your Favorites in 60 Seconds
Your beautiful guests successfully captured absolutely everything, which is amazing for a complete historical record. However, you probably only want to show grandma the PG-rated, perfectly lit highlight reels.
Open your EventSnap Drive folder in 'Grid view' (the small icon representing four small squares located in the top right corner of the Google Drive interface) so you can view large, comfortable thumbnails. Hold the Ctrl key (or Command if you are using a Mac platform) and click directly onto the photos you love the most.
Once you have selected your batch of 30 or 40 absolute favorites, right click any one of them and choose Add to Starred. Now, simply clicking 'Starred' on the left navigation menu of Google Drive will show your curated highlight reel cleanly, without moving or deleting the other 260 files from the root directory.
Pro Tip: Unlike predatory event applications that actively charge you premium upgrade fees simply to download your high resolution 'favorites', your stars in Google Drive apply to the original, full quality files at absolutely no cost.
Way 5: Batch Edit and Enhance Directly in Google Photos
The dark dance floor at a wedding reception is wildly notorious for tricky lighting. Some guest photos might be underexposed or have a strange color cast from the DJ's purple strobe lights or laser pointers.
If you transferred your EventSnap folder into Google Photos as we previously mentioned, you can use their tremendously powerful and free editing suite. Open a photo, hit 'Edit', and gently tap the magic 'Enhance' wand tool.
This auto adjustment instantaneously brightens shadows, fixes poor white balance, and makes the image burst with color. You can quickly cycle through your favorite shots sequentially, hitting the Enhance button, and fixing a dozen dark dance floor pictures in far less time than it takes to brew a hot cup of coffee.
Way 6: Create Shareable Links or Public Albums That Never Expire
Now that your event photo collection is perfectly organized and color edited, it is definitively time to share them back with the amazing people who attended! Because you permanently own the Google Drive repository, you maintain total control over who sees exactly what.
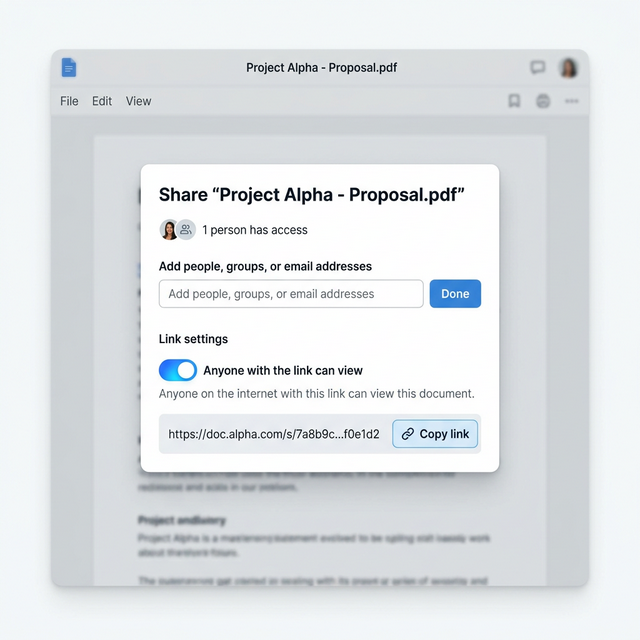
Right click your 'Favorites' folder, select Share, and confidently change the access level from 'Restricted' to 'Anyone with the link'. Ensure that the permission toggle is strictly set to 'Viewer' so nobody accidentally deletes the precious photos.
Copy the newly generated hyperlink and blast it out in your primary group chat, your dedicated Facebook group, or your family email thread. Everyone can immediately view the high-resolution folder, download the ones they are featured in, and joyfully relive the weekend festivities together.
Way 7: Turn the Best Moments into Lasting Keepsakes

The final and most emotionally satisfying step is getting the memories physically off the glowing screen and safely into the real world. By commanding the raw, high resolution original files securely in your Google Drive, you are emphatically not forced to purchase physical prints through a specific event application's heavily marked up internal store system.
You can effortlessly take your organized 'Favorites' folder and securely upload it directly to high quality physical book services like Shutterfly, Artifact Uprising, or Mixbook to rapidly design a premium hardcover photo book.
You can also magically connect your Google Photos album directly to a smart digital picture frame (like an Aura frame or modern smart television display) for your living room, or drop the link into your family WhatsApp chat so your parents can save their favorite moments to their camera roll.
Conclusion and Bonus Checklist
There you have it. In comfortably under 30 minutes, you have taken a massive, chaotic unorganized folder of 300+ guest uploads and successfully turned it into a beautifully organized, fully edited, and easily sharable archive of permanent memories.
By deploying EventSnap alongside your personal Google Drive account, you retain complete sovereignty and ownership. You skillfully avoid expiring gallery links, and expertly dodge hidden digital 'download fees'. You own these memories. Now you know exactly how to cherish and enjoy them forever without limits.
Ready to Get Organized
Download our free, one page printable layout checklist to guide you through these 7 crucial steps after your next massive corporate event or wedding.
📥 Download the PDF ChecklistCollect Photos Directly to Your Drive
Skip the complicated and expensive event apps. Let guests quickly scan a QR code and upload full resolution videos and photos directly to your personal Google Drive folder.
🚀 Start your free EventSnap event now